Showing posts with label carved cake. Show all posts

Monday, October 23, 2017

I See You - Halloween Eye Cake


I see you!  Here is another teaser to my Halloween Cake.  The bottom tier will have eyeballs :) 

The tester for this came out great. It came out a bit dry as I was needed deeper pans to accommodate the size of the eyes. The problem has since been fixed and I just fired off the real thing with black batter last night. Can't wait to put it together. There are several Halloween surprise cakes out there. This idea came from Haniela.  She has a great YouTube tutorial if you want to see the full step by step.

I started with baking several sheet cakes in various colors.Using concentric round cutters, I built the eyes. Make sure these don't get too dry as they will be twice baked. A dense recipe works best, and cut when frozen.


I made 3 colors so that as you cut through you get a different colors that will echo the entire cake theme. Then back in the freezer they go.


In the original tutorial the eyes are placed in a round, but there are gaps in them. I wanted every slice, no matter how small to have an eye.  So again, frozen is key here.  Some of the eyeballs have to be cut into a wedge shape to fill the gaps.  They are arranged in a smaller pan so that I can freeze in the round and then insert into a larger pan.  My final cake is a 7 inch round. This is a 6 inch pan.  At this point I also brushed with espresso simple syrup for good measure.  The cake batter that it sits in is a chocolate stout cake.


I didn't take a pic of the cake in the batter.  For baking, I put a layer of batter down and set the frozen eyeball ring inside, covered with more batter, making sure to get the outer edges. A few raps on the counter to make sure it all settles is never a bad idea!  I'd recommend a pan a good 2 inches taller than your eye size and a flower nail in the center.

Keep a good "eye" on it in the oven. On my final cakes, I didn't fill the center as full. It will naturally rise higher than the rest as the batter is pushed while baking.  And that can lead to dark and dry edges.

This was definitely time consuming will all the colors but super fun and exactly what I was looking for.


Saturday, April 19, 2014

Holy Sea Turtle Shaped Cake!


Holy moly folks! Thanks for all the awesome shares on this week's turtle cake.  264 likes, 66 comments, 56 shares, and over 2,900 people reached in 24 hours! Thanks to everyone that shared this. I certainly didn't expect that from a quick short notice project.  Ha, shows what I know :)

This cutie was made for a birthday girl who came into town with the Eisenhower War College this week. According to the person that ordered it, this woman goes bananas for turtles; love it!  She requested that the cake be butter cream and not fondant. So this sweet little bugger was a chocolate stout cake with Swiss meringue butter cream and from scratch dark modeling chocolate as the "shell". Since this was for a grown woman, I didn't want it to have a uber fake cartoon appearance.  After a quick google, isn't google grand, I settled on this design based off of several other similar cakes. The most amazing non fondant sea turtle cake that I found came from Love to Cake in the UK. Be sure to click the link and check out her off the charts work. I loved the naturalness (is that a word?) of the one that she did and set out to do something similar.

So from "hey I need a cake" to delivery a little less than 24 hours later, this fella was born.  I would have liked to spend more time shaping the feet as they still appear a bit bulbous for my tastes. Hopefully someone else wants one and I get another opportunity!

Thanks again everyone!


Friday, February 21, 2014

Because Everyone Needs a Zebra Print Octopus Cake


The Association of Zoo Veterinary Technicians commissioned me to make a cake for their conference held at the Alaska SeaLife Center in Seward.  
Their logo has a zebra on it and they since they were spending their week at ASLC they decided on a zebra print octopus :)
This creature took me about 22 hours to make. I wanted to look as realistic and in proportion as possible.  To do that and not have a 6 foot cake base, I designed the arms to swirl around each other so that they would fit on a 2.5 foot board.
All of my cakes are from scratch so it was easy to make it a zebra print on the inside too. Everything you see is cake and fondant except for a couple of the places where the arms are in the air. Since they need to stand up, those were made with rice krispie, covered in chocolate, and then the fondant. And as usual, it was all hand carved. 

Sunday, February 14, 2010

Cake Catch-up

This cake was made to celebrate Pat Williams 100th birthday. It was a replica of the Ray Building.

Here is the real building.

Next is a Little House on the Prairie cake for a girls birthday party. The cake was a lemonade cake with brown lemon flavored butter cream.

There were lots of shingles!

I really enjoyed this one as I used to watch the show as a little girl too.

The last picture in this post is a sea star cake for a bride to be.


Saturday, February 13, 2010

Tsunami!

This project was for the Alaska region of the NOSB event.

Vanilla cupcakes

Chocolate

It looked neat all together.


Monday, December 28, 2009

American Girl Cake

This cake was for a girl who has an American Girl doll. I was told that she has the doll named Kit and that she loves doggies.

The cute basset sitting in the American Girl shopping bag is Grace, Kit's dog.

I just wanted to snuggle it when I was done :)


Wednesday, December 23, 2009

Something Is Fishy With This Cake


This Groom's Cake was requested as a surprise at the couple's reception. They had a beautiful wedding in Argentina and had come home to celebrate with friends and family. This was my first fish cake and let's just say, I learned A LOT more about trout than I thought I would ever know :)

Instead of a traditional wedding cake, the Bride requested mini desserts.

In the first tray:
-Berries and cream in candy cups
-Key lime mini cupcakes with key lime filling and cream cheese frosting
- Coconut and pineapple cheesecakes with ginger thin and coconut crust,a dollop of coconut cream on top, and dried pineapple pieces.


Next:
-Berries and cream in candy cups - again
-Spiced apples in phyllo cups with candied walnuts
- Homemade puff pastry with goat cheese and quince paste.

Finally, we have a repeat of the cheesecake, mini cupcakes, spiced apples and cream and berries to fill out the platter

All together.

Next time I will make more candy cups and cream. They were gone in an instant. I sent Matt to get the balance and the tray was empty before he made it back to the dessert table.

This was a fun project. I really enjoyed the variety.

Congrats again to the beautiful couple!

Saturday, August 29, 2009

Treasure Chest Cake

This cake was a fun one! Well they all are fun but this one let out the little kid in me. It is a chocolate cake with chocolate butter cream and fondant decorations. Oh and of course candy jewels and coins.

Here is a close up of the butter cream woodgrain. It took a bit to figure out the right look but it was so worth it and best of all I know how to approach it next time.

The party was complete with a sword fight between Captain Jack Sparrow and Davy Jones.


Aww look, they made up :)


What a great party it was. The lucky boy's Mom and Dad are going to a hard time topping this one!


Friday, July 10, 2009

American Eagle Shopping Bag Cake


This one was for a young woman that LOVES to shop! It is a vanilla butter cake with vanilla buttercream and covered in mmf.

Fondant "tissue paper", gumpaste handles, and fondant flip flop.


Another flip flop and a very long fondant receipt. Did I mention that she really likes to shop?


Little clutch with stitching and button button detail.


This cake was serious fun to make. I hope I get to play with more bags in the future. Boy did that sound bad!


Tuesday, July 7, 2009

Happy Sweet Sixteen- Purse Cake


This has been a week of birthday cakes. I have had 3 due in little less than a week. Not that I am complaining mind you. I have enjoyed the rush immensely!

The purse is a firm butter vanilla cake with simple vanilla buttercream under the fondant.

It was for a Sweet Sixteen party, can you tell :) I was told that the teen was so tickled that she saved the plaque part with her name.

Here is a closeup of the gumpaste handle. To form the handle I let it dry over a Moose's Tooth growler.

Another Angle.
Well back to work. One more cake due on Thursday. Then out to dinner for my birthday!

Sunday, May 31, 2009

Luau Party For the TYC Fundraiser


This fun project was for a fundraiser for the TYC in town. It was aboard the Renown Tours Glacier Express catamaran. Their helpful crew even cleared out a few rows of seats to make room for a dance area on board. My son goes to the TYC, Teen and Youth Center, afterschool. They also have camps for school inservice and vacation days, as well as summer camps. My son loves it and always has a great time!

Done plugging local businesses, now back to the cake :)

The cake was a chocolate devils food cake with chocolate buttercream between the layers. On top of that a layer of ganache and then the fondant.

Here is a close up of the button and stitching detail. The buttons were a fondant and gum paste mixture with fondant "threads".
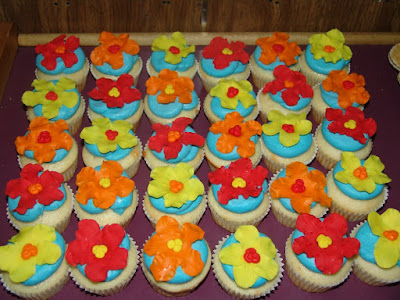
Cupcakes to match. These were a simple vanilla butter cupcake with lemon cream cheese frosting. The flowers were fondant mixed with a bit of gum-tex to make them firm and more durable.


I have lots of cake scraps bagged up in the freezer. At the last minute I pulled some out and made boozy cake bon bons. It was a 21 and over party with a bar on board so boozy desserts were in order. This recipe is based off Bakerella's cake pop recipe. I used scraps of devils food cake and a brown sugar cream cheese frosting with coffee flavored Kaluha in it. Then dipped the frozen balls of cakey frosting goodness in a chocolate ganache and topped with fondant flowers left over from another luau project. As I mentioned, these were a last minute thought so please ignore the finger prints and drips. Thank goodness the lighting on the craft was dimmed!

Here is a shameless sign that Josie from the TYC made for me. Thanks Josie!!

Finally, here is a pic of the entire spread before everyone boards and I head off the boat.