Thursday, December 31, 2009

Daring Bakers - Gingerbread House

The December 2009 Daring Bakers’ challenge was brought to you by Anna of Very Small Anna and Y of Lemonpi. They chose to challenge Daring Bakers’ everywhere to bake and assemble a gingerbread house from scratch. They chose recipes from Good Housekeeping and from The Great Scandinavian Baking Book as the challenge recipes.

I chose to use the recipe submitted by Y. You can find the instructions and both recipes here.

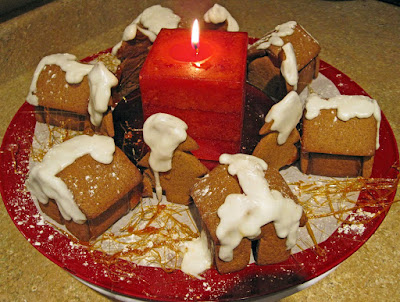
The dough handled well. There wasn't too much shrinkage and it was fairly sturdy. Instead of one large house I chose to do a gingerbread centerpiece. It was small and easy to tuck do in stages and tuck away while I worked on other Holiday projects.

The only problem I had was with the theft and consumption of my freshly baked pieces. I had a lot of irons in the fire the day I was baking these and had set them aside to cool. Matt was had been coming into the kitchen and was snacking on something. I had assumed he was eating the peppernuts that were also fresh out of the oven. Nope, was I wrong. I took a break and looked over to see him eating something square.

Me -Hun, what are you eating?
Gingerbread Thief -The ginger cookies.
Me - Honey, how do they taste?
Gingerbread Thief - Kind of blah.
Me - Uh, well those are for my gingerbread houses.
Gingerbread Thief - Oh... well I guess you will have garages now.
Me - More like carports!

It must have been a Christmas miracle because I had exactly enough!


Monday, December 28, 2009

American Girl Cake

This cake was for a girl who has an American Girl doll. I was told that she has the doll named Kit and that she loves doggies.

The cute basset sitting in the American Girl shopping bag is Grace, Kit's dog.

I just wanted to snuggle it when I was done :)


Wednesday, December 23, 2009

Something Is Fishy With This Cake


This Groom's Cake was requested as a surprise at the couple's reception. They had a beautiful wedding in Argentina and had come home to celebrate with friends and family. This was my first fish cake and let's just say, I learned A LOT more about trout than I thought I would ever know :)

Instead of a traditional wedding cake, the Bride requested mini desserts.

In the first tray:
-Berries and cream in candy cups
-Key lime mini cupcakes with key lime filling and cream cheese frosting
- Coconut and pineapple cheesecakes with ginger thin and coconut crust,a dollop of coconut cream on top, and dried pineapple pieces.


Next:
-Berries and cream in candy cups - again
-Spiced apples in phyllo cups with candied walnuts
- Homemade puff pastry with goat cheese and quince paste.

Finally, we have a repeat of the cheesecake, mini cupcakes, spiced apples and cream and berries to fill out the platter

All together.

Next time I will make more candy cups and cream. They were gone in an instant. I sent Matt to get the balance and the tray was empty before he made it back to the dessert table.

This was a fun project. I really enjoyed the variety.

Congrats again to the beautiful couple!

Wednesday, December 16, 2009

Happy Holidays!


Many of you have probably seen little cake balls pop up all over the place lately. These little guys are my kitchen sink of the truffle world. What few scraps that manage to evade Matt and his big glass of milk are frozen and set aside for this sort of project.

The version above was chocolate cake, chocolate cupcakes, a few vanilla cupcakes, a package of ginger thins that were going to waste, buttercream frosting, cream cheese, and a few Anthon Berg liqueur filled chocolate bottles chopped up for good measure.

The recipe is simple.

Crumble cake pieces, cookies, graham crackers, nuts, or what have you in a bowl. To this add frosting, fillings, jams, or cream cheese to the crumbs. Mix.

You don't need much frosting or cream cheese. A little dab will do it. As you work it the mixture will become tacky and hold together in a ball well. If you add too much it will become slimy. The cake scraps don't need much moisture to hold together. In fact just a splash of rum or liqueur works well in place of frosting.

Make balls with the mixture and set in the fridge or freezer to chill and firm up. You want a dense and tightly rolled ball, anything loose will come apart when you try to coat it.

Melt chocolate or candy coat. Dip the balls and set aside to dry. If you froze the balls remove them from the freezer and allow the chill to come off or the coating will crack.

Had enough scrappy goodness? If not, here is a post from earlier this year.

Happy Holidays!


Monday, September 28, 2009

Daring Bakers - Vols-au-Vent

The September 2009 Daring Bakers' challenge was hosted by Steph of A Whisk and a Spoon. She chose the French treat, Vols-au-Vent based on the Puff Pastry recipe by Michel Richard from the cookbook Baking With Julia by Dorie Greenspan.

You can find the recipe here. The recipe is lengthy but not difficult. It is simple and only takes a little bit of planning. I have made puff pastry before and this recipe did not disappoint! As the recipe states, be sure to use good quality butter, use and oven thermometer, and chill the pastry shapes before baking.

This time I filled my pastry cups with Goat Cheese, quince paste, and fresh mint from a co-worker's garden.

And I since it is almost October, I couldn't help but play around. Below is a pick of some batty puff pastry.

Go ahead, try it. It is simpler than you think and you will never want the store bought stuff again!

Wednesday, September 23, 2009

An Alaskan Wedding Cake

This wedding cake was for and Alaskan Bride and Groom that work at the Alaska SeaLife Center. It was a vanilla cake with strawberry and white chocolate ganache filling, white chocolate ganache layer over the cake, and then topped with fondant.

I was trilled to be able to make a truly Alaskan wedding cake topper! Thanks for the opportunity guys. I really appreciate it.

Here is a close up of the Bride and Groom.

Complete with a just married sign.

And finally a link to another xtra tuf post of mine.

Best wishes to the Bride and Groom!

Thursday, September 10, 2009

Saltimbocca - BakeSpace Coast to Coast Challenge


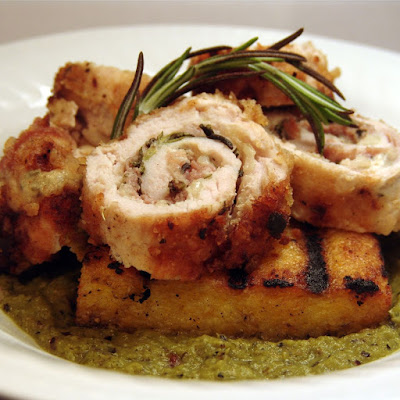
The BakeSpace Coast to Coast dish this round was saltimbocca. Here is my take:

Pork Saltimbocca On Grilled Polenta Squares With Grilled Green Pepper Puree.

Items needed:

Polenta-
Course cornmeal/Polenta
Water or broth
Butter
Olive oil for grilling

Saltimbocca-
Boneless porkchops
Prosciutto or ham
Herbs/seasonings of your choice
Garlic
Sour Cream
Shredded mozzarella
Fresh Parmesan
Sage - didn't have so used rosemary
Flour
Panko
Olive oil

Green Pepper Puree-
Green Bell Peppers, whole
Olive oil
Fresh Parmesan Cheese, grated

Prepare your polenta using your favorite recipe or as directed on package. My basic recipe is as follows:

Bring 6 cups salted water or broth to boil. Add 2 cups polenta once the water starts to boil. Turn down to a simmer and simmer covered until it is thick and the grain is soft. Add a couple of tablespoons butter to taste. Be sure to use a deep pot and a long handled spoon because it spits as it simmers and trust me, those spit ups burn!

To make squares simply spread into a 9 x 13 pan. Use the bottom of another 9 x 13 pan to push down and compress the polenta so that you get solid and durable squares. Allow to cool in fridge for at least 30 min. I prefer a couple of hours.

On to the MEAT!

Pound chops until thin. I had a big package of Costco mile thick chops so I cut them in half horizontally. My meat mallet was no where to be found. I know I had one before I moved in with Matt but had a feeling it was outside in the storage building with all this his and her junk. Since it was cool and raining I decided to stay inside. While oinking on tummy warming polenta I found a citrus juicer to use instead.

To cheese or not to cheese. I elected to add cheese. The mixture spread below is a paste made with salt, pepper, fresh thyme, fresh oregano, garlic, olive oil, sour cream, crumbled mozzarella, and freshly grated Parmesan.

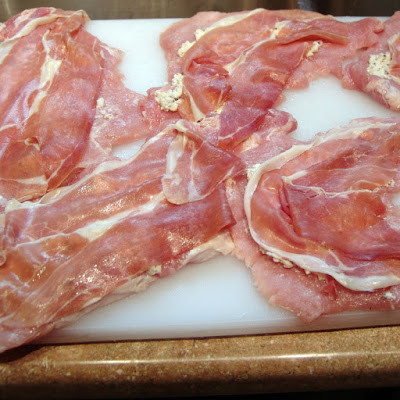
Place prosciutto or ham on top of the cheese.

Lay down sage, if you have it. There was no fresh sage to be found in town so I used some organic Rosemary that I received in my CSA box. In hindsight this was A LOT of rosemary. I am used to the half/mostly dead fresh rosemary that we get in the store here. Next time I will add a bit less!

Roll up and wrap with plastic. Place in the fridge for at least 30 min. I prefer to do this so that I don't have to use toothpicks later on.

While the meat is chilling brush olive oil on a few bell peppers and grill until blackened. Set the grilled peppers to the side to rest.

Prep the polenta for grilling. Remove the polenta slab from the fridge and cut into squares.

Preheat the oven to 350. Pull the pork out of the fridge. Remove the plastic. Roll a very thin layer of panko and flour. I wanted a thin crisp layer, not a breading. Drizzle a bit of olive oil on a skillet and cook the pork until browned but not done in the center. Place the browned pork in oven to cook the rest of the way. Continue with remaining rolls if needed.

While the pork finishes in the oven grill the polenta. Brush one side of the polenta and also the grill with olive oil. Grill until crisp and grill marks appear.

Puree the bell peppers. Add olive oil and Parmesan to taste. Set aside.

Pull the pork out of the oven and let rest.

Brush the other side of the polenta with oil and flip to grill the other side. Remove from the grill.

Plate and enjoy!

Check out the other bakespace bloggers. Thanks to DDpie we have a clickable map of all the participants. How awesome is that!

And here is the BakeSpace link if you want to join in on the fun!

Saturday, August 29, 2009

Treasure Chest Cake

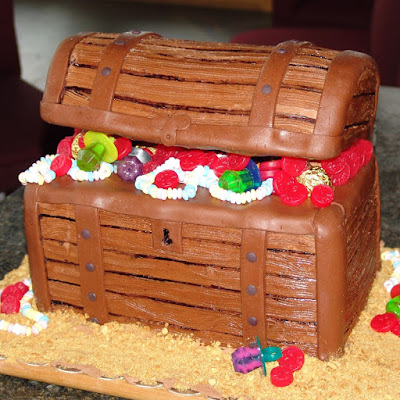
This cake was a fun one! Well they all are fun but this one let out the little kid in me. It is a chocolate cake with chocolate butter cream and fondant decorations. Oh and of course candy jewels and coins.

Here is a close up of the butter cream woodgrain. It took a bit to figure out the right look but it was so worth it and best of all I know how to approach it next time.

The party was complete with a sword fight between Captain Jack Sparrow and Davy Jones.


Aww look, they made up :)


What a great party it was. The lucky boy's Mom and Dad are going to a hard time topping this one!


Thursday, August 27, 2009

Dobos Torte - Daring Bakers


The August 2009 Daring Bakers' challenge was hosted by Angela of A Spoonful of Sugar and Lorraine of Not Quite Nigella. They chose the spectacular Dobos Torte based on a recipe from Rick Rodgers' cookbook Kaffeehaus: ExquisiteDesserts from the Classic Caffés of Vienna, Budapest, and Prague.

Everything I have been making lately has been chocolate so I chose to do a lemon variety with lemon butter cream and lemon curd between the layers. I have had back to back cakes and totally rushed this..not recommended!!

The flavor was great and the sponge reminded me of a fluffier version of a tuile cookie. I made 3 small tortes and one was sacrificed to the quality control tester and immediately approved.

I will definitely make again but not using the butter cream in the recipe given. The butter cream was too finicky, especially in the stormy humid night we had tonight. It was also a tad greasy for my taste. Believe me, I love butter but this seemed more like a bowl of whipped butter with a little sugar and egg thrown in. Honey butter on cake maybe? Hmm, no that is an interesting idea LOL!

The caramel on top was fun and the next time I make it I will take my time and play with the sugar top more.

Check out Angela's site for the recipe.

Overall, this is a great cake that lends itself to a multitude of possibilities!

Monday, August 24, 2009

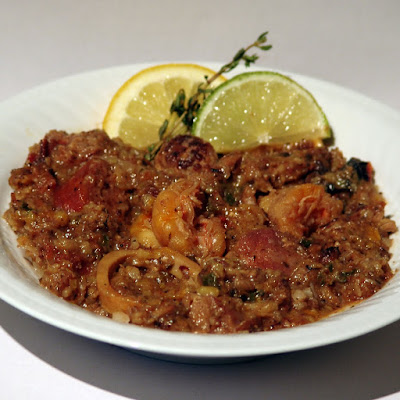
Paella - Bakespace Coast to Coast Recipe 2

First of all, those of you who haven't checked out Bakespace, get on over and check it out! Over the last couple of weeks a group of us have been giving Paella our own personal touch.

My version is loosely based on this Epicurious recipe. I say loosely because I just kept throwing in things that I found in my fridge and freezer.

One thing I couldn't find was decent squid, clams, or mussels. The squid I found in town was packaged in a box with nothing to keep people out. You could literally flip the top of the box open and touch the squid. EWWWW!! I couldn't help but wonder how many people had poked at it before it reached me.

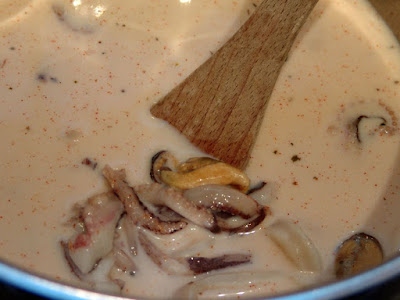
I did find a bag of "seafood mix". It had little bits of squid, clams, octopus, you name it. It being only a few bucks a bag had me worried. To try to remedy any terrible fishy taste I rinsed the mix well and let it soak in milk and cayenne for a few hours.

See? Soaking the mix.
Next, I made a fresh herb paste out of thyme, oregano, cilantro, cayenne, coriander, olive oil, balsamic vinegar, salt, and pepper.

Most was rubbed on the chicken thighs. A small portion was reserved for the onions. I grilled the thighs and set them aside.

Up next were the veggies. Onions, squash, red, green, and yellow bell peppers were grilled.

In a cast iron skillet I tossed in rough cut chunks of onion, thick cut bacon, salt pork, and the remaining herb paste. After the bacon was cooked but still soft I removed it from the pan to set with the chicken thighs.

Only Mexican chorizo existed in the local stores so I used andouille instead. This was sauteed with crumbled Italian pork sausage until both were well browned.

The sausage was added to the container with the chicken, bacon, and onions and left to rest.

Next in the skillet was the arborio rice. I didn't drain the grease and toasted it until golden and speckled.

In a large stock pot I poured in clam juice, chicken stock, a pinch of saffron, the rice and set to boil.

While the rice was boiling I deglazed the cast iron skillet with a splash of Guinness.

To the boiling rice and broth I added halibut cheeks, snapper from a fisherman friend, and shrimp. The seafood mixture was drained, rinsed, and added at this time as well. I forgot to take pictures of the fish but trust me, the cheeks were lovely!

After the rice had softened the resting meats and veggies were added. So was the contents of the deglazed pan and the rest of the Guinness. I threw in a few diced tomatoes and a can of Italian diced tomatoes for good measure.

I set this all to simmer for about 20 minutes.

Now that all said, I would LOVE to have a Paella pan as I think it would keep the quantity from growing on me. It was delicious but I ended up with a huge stock pot of paella. Thank goodness for a foodsaver!!

BTW, the leftovers are delicious rolled up in a tortilla with a little cheese and fresh tomatoes :)

Click the links below to check out the rest of the beeps:

http://peacefulcooking.blogspot.com/2009/08/paella-coast-to-coast-and-guest.html

And her guest blogger!

http://sprytesplace.blogspot.com/2009/08/paella.html

http://myitaliangrandmother.blogspot.com/2009/08/paella-for-sea-fearing-coast-to-coast.html

Scroll down this page to see Martha's paella http://www.bakespace.com/forums/viewtopic.php?t=7196&postdays=0&postorder=asc&start=30

Go ahead, give it a try! As you can see there are so many ways to make this dish.